Connect your WooCommerce shop
Connect a WooCommerce shop with one click or with a key you create yourself, understand the permission it needs, and disconnect it cleanly.
If your online shop runs on WooCommerce, Konvuno can read your products straight from it and keep up with every new product, price change and sold-out size. You approve the connection inside your own WordPress admin, and Konvuno only ever reads products — it never changes anything in your shop.
Before you start
- You need to be the owner of the business in Konvuno, and have an active subscription.
- You need to be able to sign in to your WordPress admin as an administrator.
- One shop can be connected at a time — WooCommerce or a product feed.
Step 1 — Check your shop
- On the Catalog screen, under Sources, click Connect on the WooCommerce tile.
- Type your shop's address, such as
myshop.com. - Click Check shop.
Konvuno checks that your shop's WooCommerce connection point (its API) can be reached, before it sends you anywhere. If it can, you see your shop's name and the next step.
If the check fails
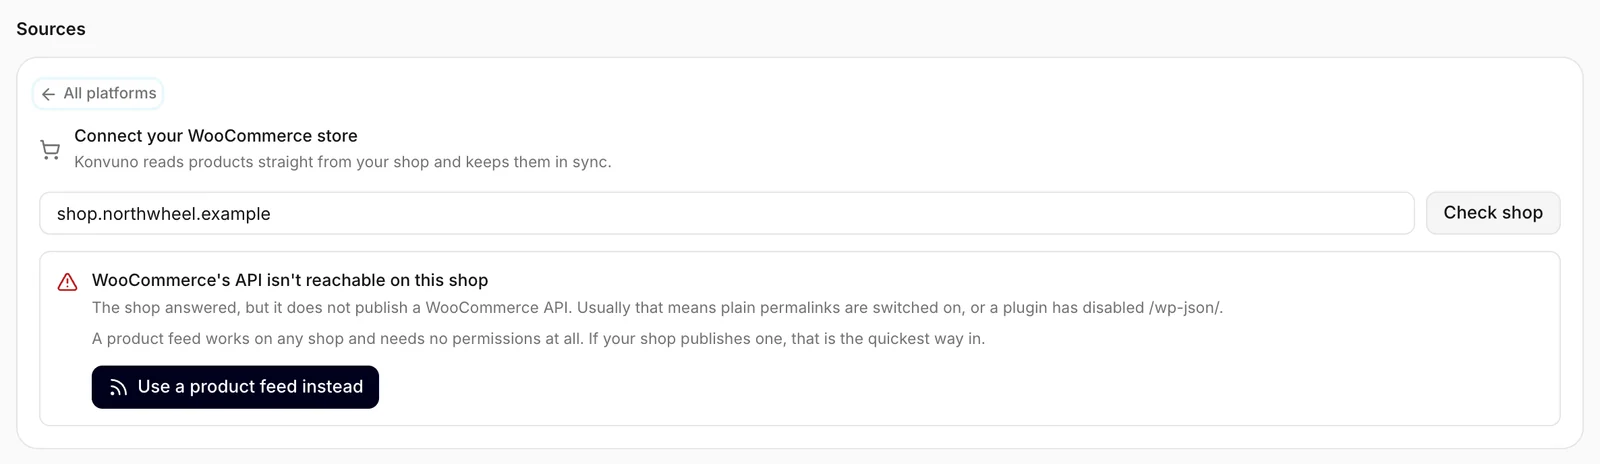
WooCommerce's API isn't reachable on this shop means the shop answered, but Konvuno could not talk to WooCommerce. The box says why. The usual causes:
- Plain permalinks. WooCommerce's API needs "pretty" links. In WordPress, Settings → Permalinks shows which one you use; anything except Plain works. Changing it changes your page addresses, so ask whoever looks after your website first.
- A security plugin or firewall blocks the API. Your web host or developer can allow it.
You do not have to fix it: Use a product feed instead takes you to the product feed, which works on any shop and needs no permission at all.
Step 2 — Authorize in WooCommerce
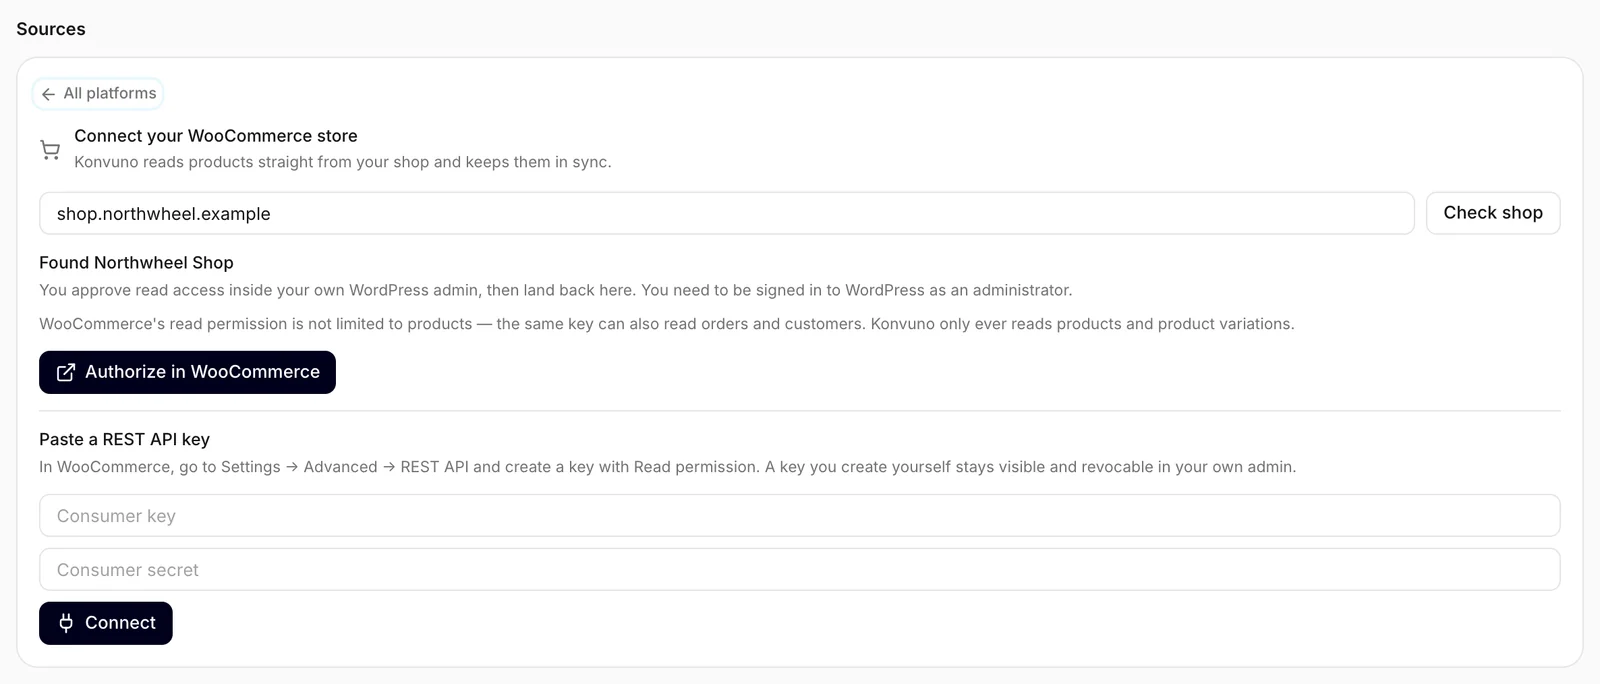
- Click Authorize in WooCommerce. Your shop's WordPress admin opens — sign in if it asks.
- WooCommerce asks whether Konvuno may have Read access to your shop. Approve it.
- You land back on the Catalog screen. "Waiting for your shop to send the keys…" shows for a moment, then "Importing your catalog…".
When the first import is done, a message tells you how many items were imported, and the WooCommerce tile shows Connected.
What the permission means
WooCommerce offers apps only three kinds of access: read, write, or both. Konvuno asks for the smallest one, read.
WooCommerce's read permission is not limited to products — the same key can also read orders and customers. Konvuno only ever reads products and product variations. Konvuno cannot change prices, create orders or delete anything, because read access does not allow it.
If you would rather see and control the key yourself, create it by hand instead — see the next section.
Or: paste a key you create yourself
Use this if the one-click way does not come back (you see The authorization did not come back), or if you prefer to create the key in your own admin.
- In WordPress, go to WooCommerce → Settings → Advanced → REST API.
- Click Add key. Give it a description such as "Konvuno", choose your own administrator account as the user, and set Permissions to Read.
- Click Generate API key. WooCommerce shows a consumer key and a consumer secret — copy both now; the secret is shown only once.
- Back in Konvuno, check your shop as in step 1, then click I'd rather create the key myself.
- Paste the Consumer key and the Consumer secret, then click Connect.
Konvuno tests the key against your shop before it saves anything, so a key that does not work on your shop is refused straight away instead of failing later.
What Konvuno imports
- Published products that are visible in your shop. Drafts, private and hidden products are left out.
- Variable products with each variation — every size or colour becomes its own row, and the assistant sees them as one product with several options. Each variation counts toward your plan; see Items and your plan.
- External or affiliate products, linking to their external address.
- For each product: the name, description, first category, brand, price, the sale price while a sale is running, whether it is in stock (backorder counts as available), the main image and the link to the product page — or to the exact variation.
Grouped products are not imported as such; the products inside them are imported one by one. Stock quantities are not read.
As with a feed, imported products do not appear in the table on the Catalog screen. After the first import the assistant answers from your shop's catalog — or from both, if you already have items of your own — see Which catalog the assistant answers from.
How it stays up to date
Konvuno checks your shop for changed products a few times a day, and once a day it reads the whole shop again. New products, price changes and stock changes arrive with the next check. A product you delete in WooCommerce disappears from Konvuno at the next full read, within about a day.
To read the shop straight away, an owner can click Sync now on the tile — it reads the whole shop, deleted products included. See Sync now.
A very large shop may be too big to read in one go. The import then fails with an error — connect a product feed instead, which is read in one piece and copes with large shops.
When something goes wrong
If an import fails, the tile shows Error, and a Sync error box appears under the card, saying what went wrong — for example that the shop refused the key, or that it has too many products to read in one go. Konvuno retries automatically every few hours. Your products stay in Konvuno as they were after the last good import.
The most common cause is a deleted or changed key in WooCommerce. Once the cause is fixed, click Reconnect — Konvuno tests the key again and starts a full import. If the key is gone for good, disconnect and connect again.
If your plan cannot hold every product and variation, you see Catalog too large for your plan instead, and nothing is imported until it fits. See Items and your plan.
Disconnect, and remove the key
Click Disconnect on the WooCommerce tile and confirm. Only the owner can do this. Everything Konvuno imported from your shop is removed from your catalog, items under Added manually stay, and Konvuno deletes its copy of the key.
This removes the synced catalog and Konvuno stops using your API key. WooCommerce does not let an app delete its own key — remove it yourself under Settings → Advanced → REST API. You can reconnect anytime.
To remove the key in WooCommerce:
- In WordPress, go to WooCommerce → Settings → Advanced → REST API.
- Find the key Konvuno used — its description starts with "Konvuno", or is the one you gave it.
- Hover over it and click Revoke.
Tip
Revoking the key without disconnecting in Konvuno first makes the next import fail. Disconnect in Konvuno, then revoke — in that order.
WooCommerce or a product feed?
| Choose WooCommerce when | Choose a product feed when |
|---|---|
| You can sign in to WordPress as an administrator | Someone else runs your shop and can send you a feed address |
| You have no feed plugin and do not want one | Your shop already publishes a Google Merchant or Facebook feed |
| Your shop is small to medium-sized | Your shop is very large, or the WooCommerce check fails |
A feed also needs no permission at all — Konvuno simply reads the same public list Google reads.
How other businesses use it
- A tea shop on WooCommerce clicks Authorize in WooCommerce, approves in WordPress, and has its 140 teas in Konvuno five minutes later.
- An outdoor gear shop whose security plugin blocks the one-click way pastes a key it created under REST API instead.
- A web agency connecting a client's shop signs in to the client's WordPress with an administrator account the client created for it.
- A clothing boutique with a feed plugin already installed for Google Shopping picks the product feed instead, so no key is needed at all.